Introduction
In this portfolio project you will use the Lunevedy app and custom CSS styles to design and create a number of hero blocks.
Project resources
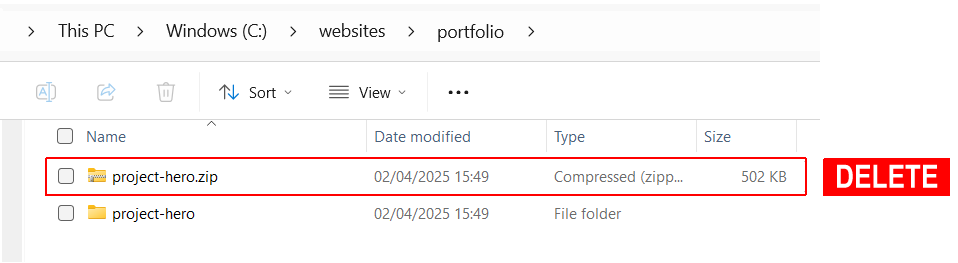
Your task is to download the ZIP file you need for this project.
- Download the following ZIP file: project-hero.zip
- Unzip this file into your portfolio folder, where it will create a new folder named project-hero.
- When finished, you can delete the project-hero.zip file.
All the text you need for this portfolio project is in the file below. Only <p> tags have been used for basic formatting.
You do not need to download this file. You can simply copy-and-paste from it.
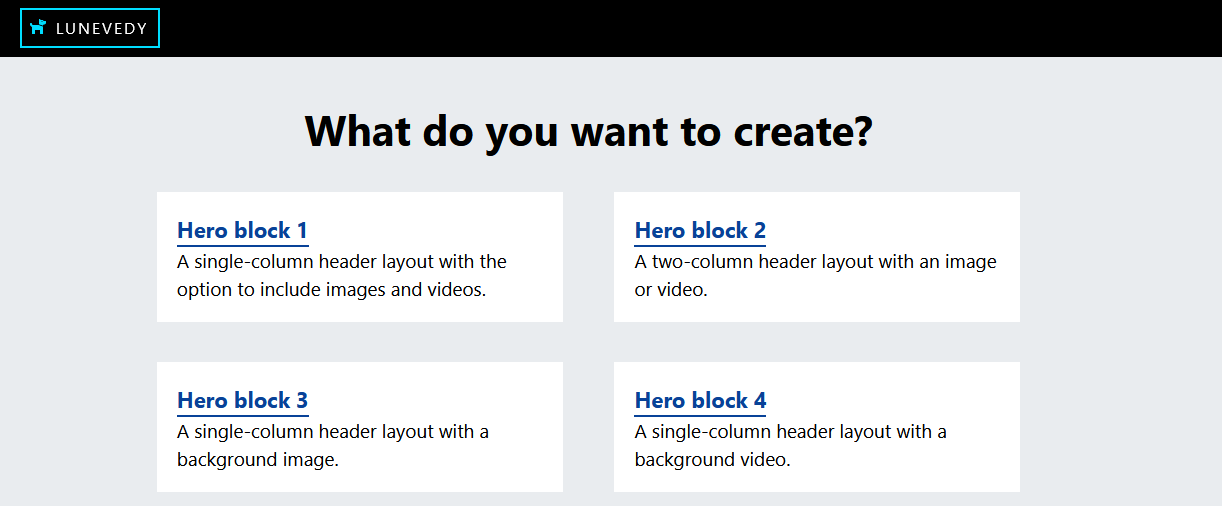
In creating the gallery of hero blocks, you will use the Hero Block layout options within the Lunevedy app.
Google Fonts
You will be using a number of Google Fonts for this project. Except for the fifth and final sample hero block, the font links are already included in the <head> parts of the sample web pages.
For these fonts to display correctly, you will also add them to your stylesheets files as you progress through this project.
The hero-1 block
Your first finished hero block should look similar to that shown below.

In VS Code, open the index-1.html and custom-1.css files.
Working with the index-1.html file
Follow these steps:
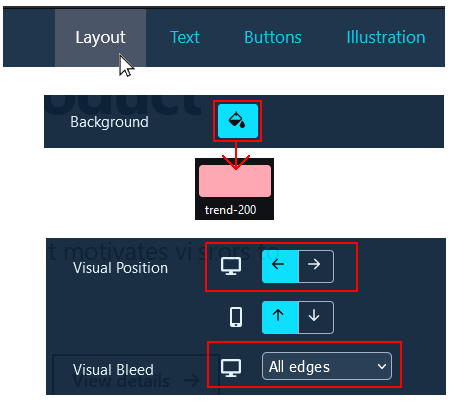
- On the home page of Lunevedy, choose the Hero block 3 layout.

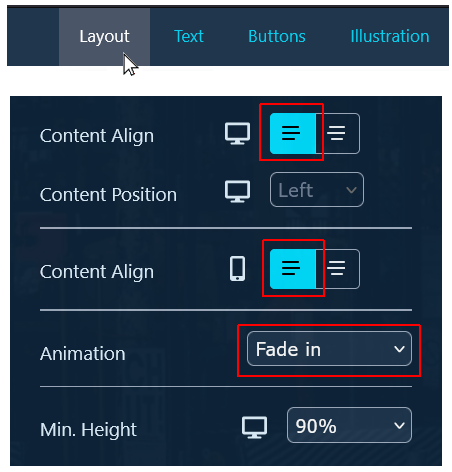
- On the Layout menu, choose the following options.
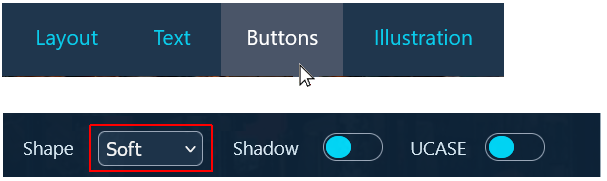
- On the Buttons menu, for both Button 1 and Button 2, choose the following options.
- Click the HTML button near the bottom-right of the screen. (Note that the CSS button is not enabled because you have not updated any default colours.)
- Switch to VS Code and display the index-1.html web page.
- Paste the copied HTML over the empty <header> tag pair and the comment line above it.

- Update the pasted content with the relevant words from the text.html file and the downloaded music.jpg image.
When finished, save your index-1.html file. In your web browser it should look as shown below.

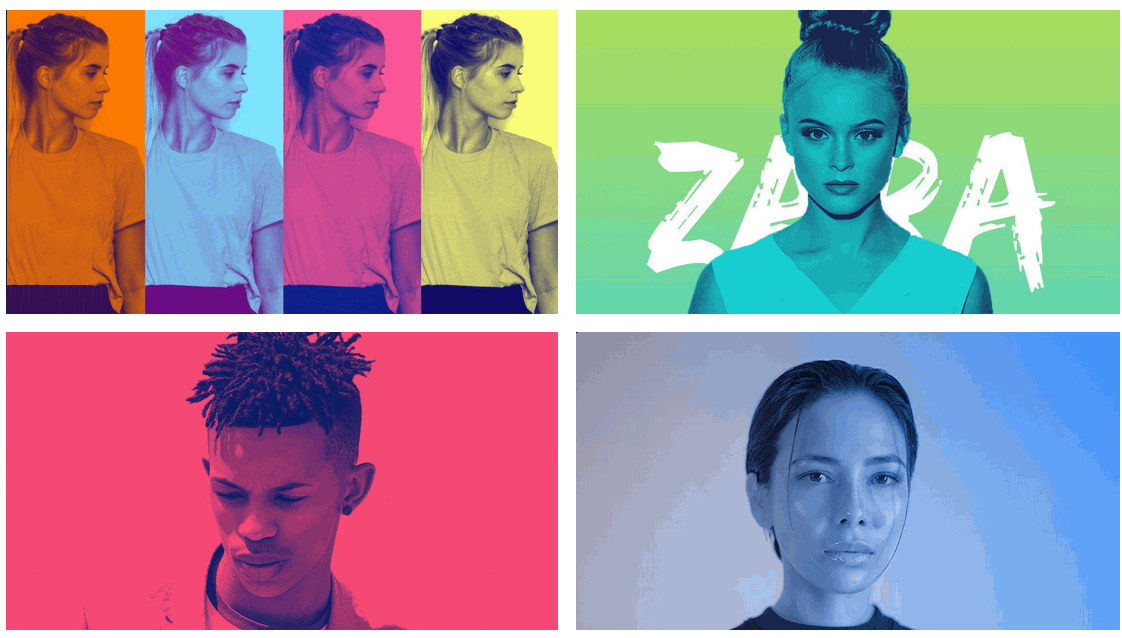
Adding a duotone effect to the hero image
The duotone effect is the use of two (a duo) contrasting colours to create a dramatic and visually pleasing effect in graphic design. See the examples below.
In the steps below you will apply a duotone effect to the hero background image.
- In a new browser tab, open the Duotones web page.
- Click the Camera icon to upload your music.jpg image.
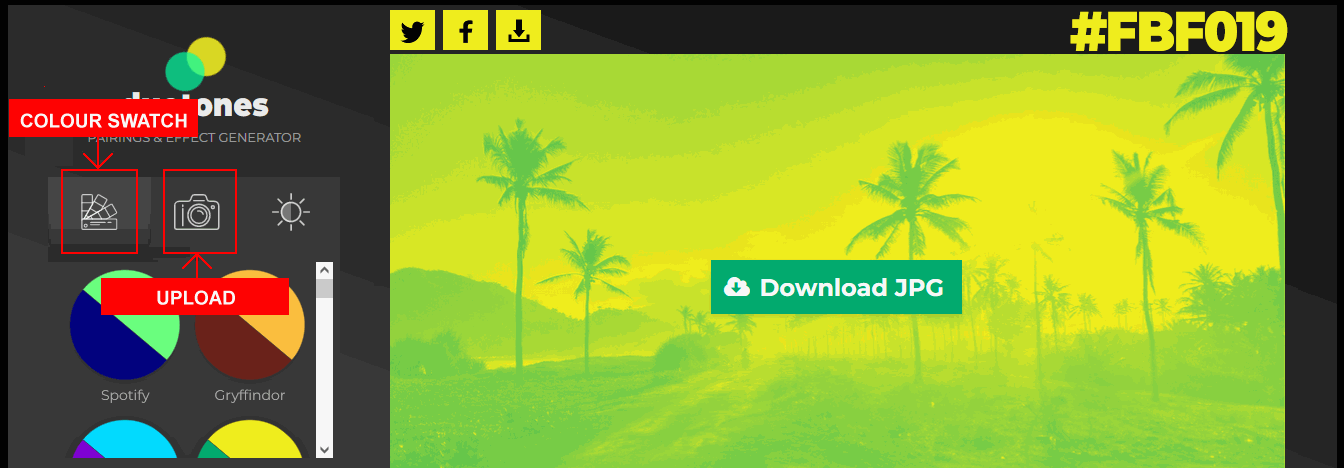
- Click the Color Swatch icon to apply a duotone effect of your choice. Choose one of the darker options, as your white text must be readable against this image background.
- Click the image to download it and copy it to your portfolio/project-hero/assets/img folder. The image will have a new file name of duotone.jpg. Update your index-1.html file accordingly and save the file.
See the example below.

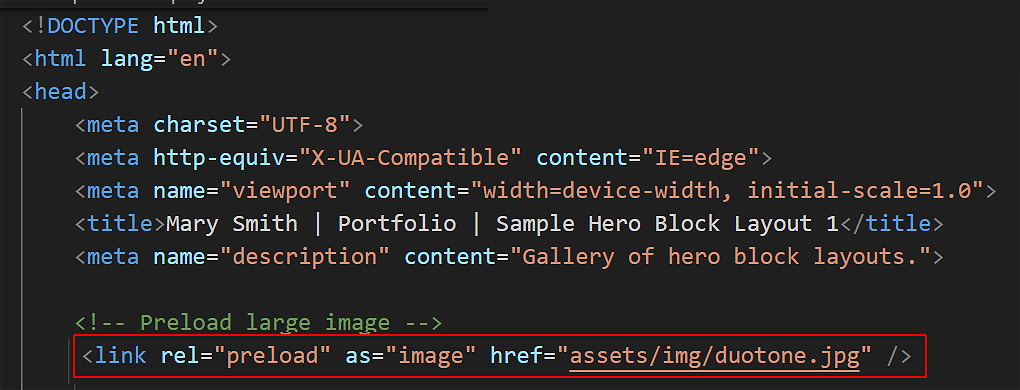
Update the preload line of your <head> as shown below.
Working with the custom-1.css file
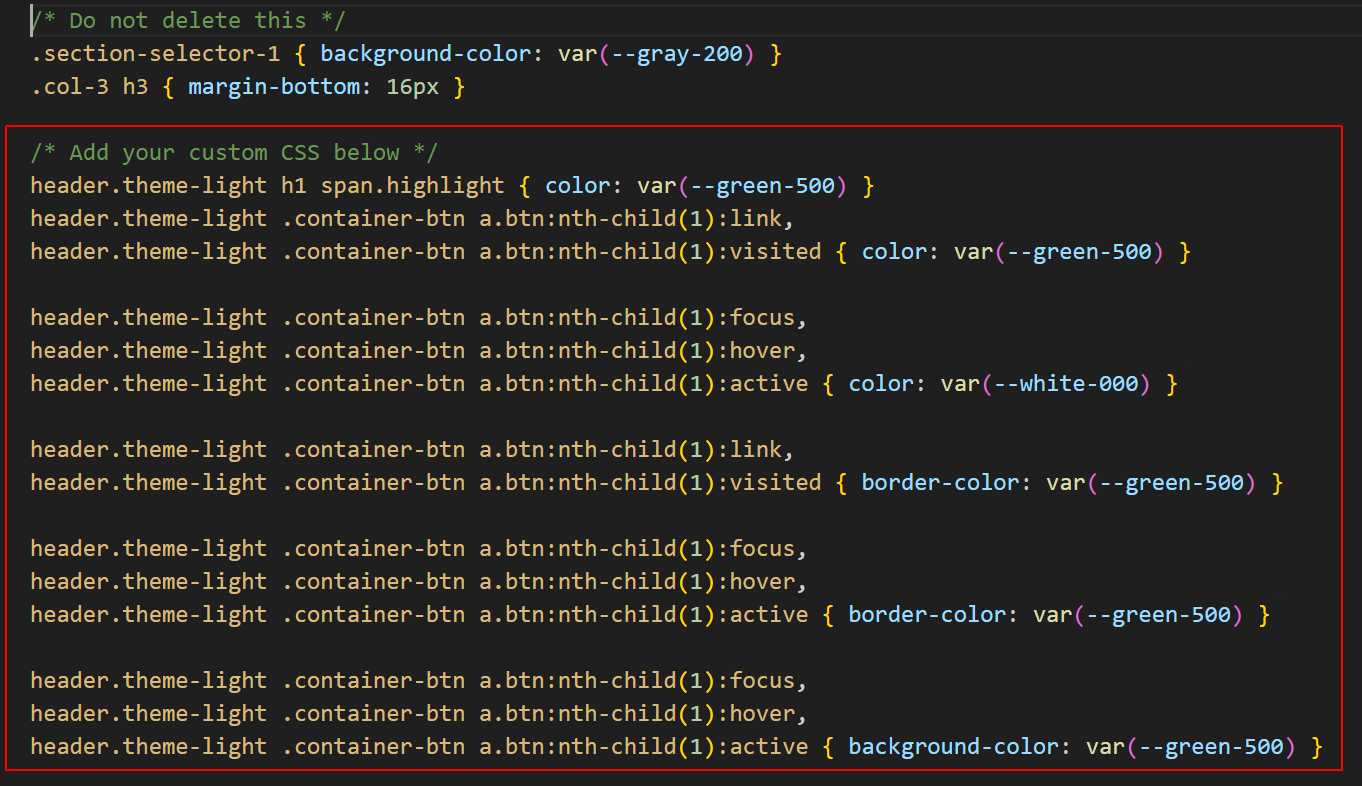
Display the custom-1.css file and add the new style rules below.
header h1, header h2 {
font-family: 'Abril Fatface', serif;
letter-spacing: 1px;
}Save your index-1.html and custom-1.css files.
✅ All done. Your first hero block is now complete.
The hero-2 block
Your second finished hero block should look similar to that shown below.

In VS Code, open the index-2.html and custom-2.css files.
Working with the index-2.html web page
Follow these steps:
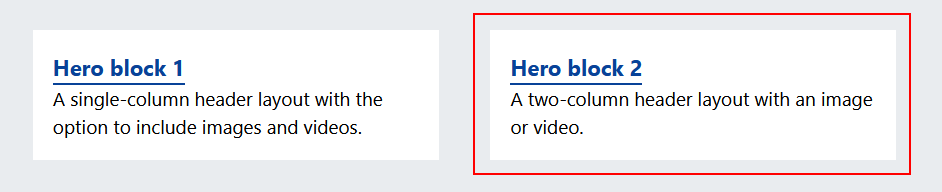
- On the home page of Lunevedy, choose the Hero block 2 layout.
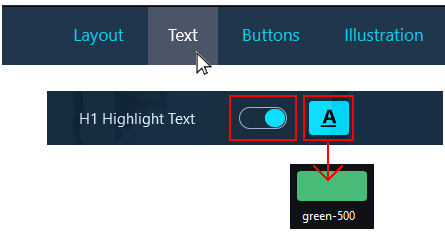
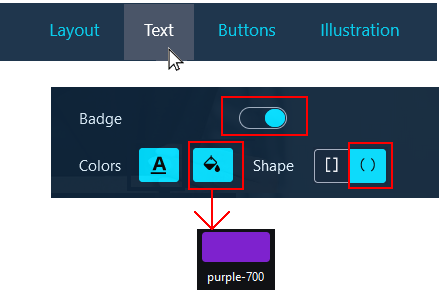
- On the Text menu, choose the following options.
- On the Buttons menu, choose the following options.
- Click the HTML button near the bottom-right of the screen.
- Switch to VS Code and display the index-2.html web page.
- Paste the copied HTML over the empty <header> tag pair and the comment line above it.
- Update the pasted content with the relevant words from the text.html file and the downloaded analytics.png image.
Working with the custom-2.css file
Follow these steps
- Return to the Lunevedy app and click the CSS button at the bottom-right of the screen.
- In VS Code, in the custom-2.css stylesheet, paste in the copied styles.
- Add the new style rules below.
header h1 { font-family: 'Lato', sans-serif; font-weight: 900; } header h2 { font-family: 'Lato', sans-serif; font-weight: 400; line-height: 1.4; }
Save your index-2.html and custom-2.css files.
✅ All done. Your second hero block is now complete.
The hero-3 block
Your third finished hero block should look similar to that shown below.

In VS Code, open the index-3.html and custom-3.css files.
Working with the index-3.html web page
Follow these steps:
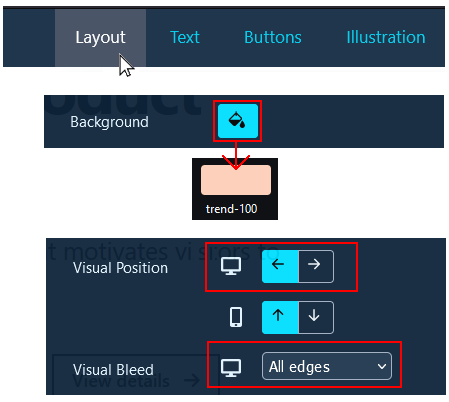
- On the home page of Lunevedy, choose the Hero block 2 layout.
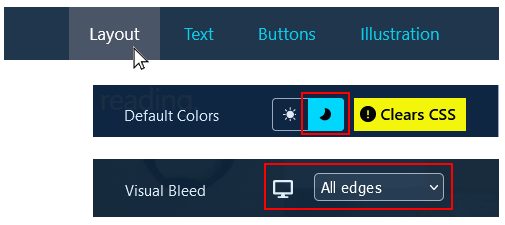
- On the Layout menu, choose the following options.
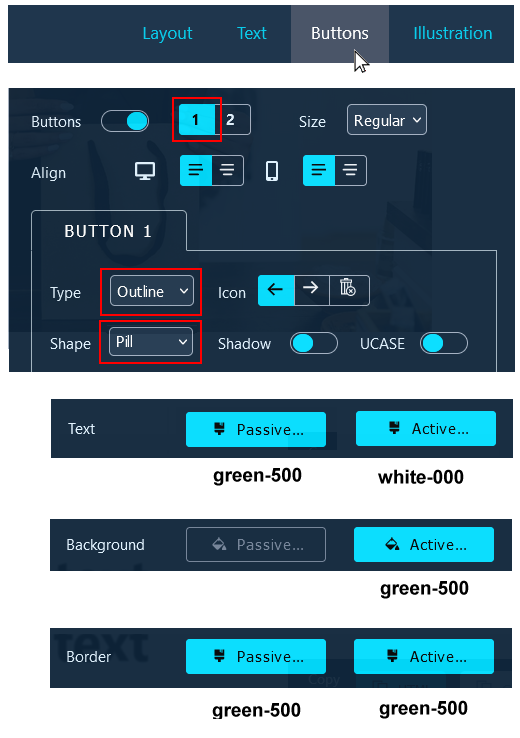
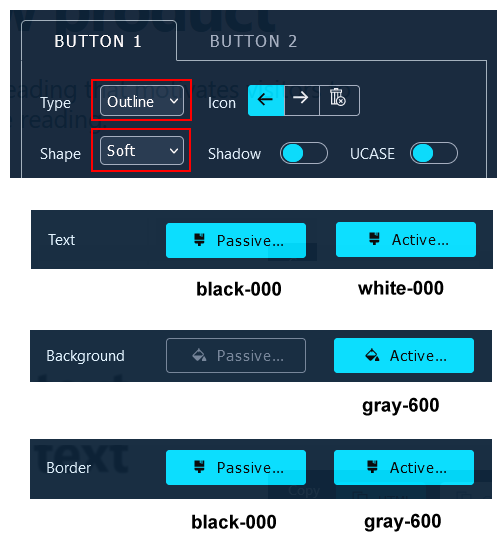
- On the Buttons menu, in the BUTTON 1 tab, choose the following options.
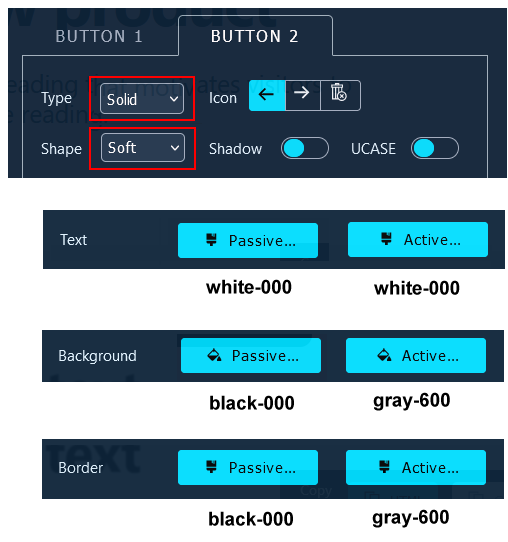
- On the Buttons menu, in the BUTTON 2 tab, choose the following options.
- Click the HTML button near the bottom-right of the screen.
- Switch to VS Code and display the index-3.html web page.
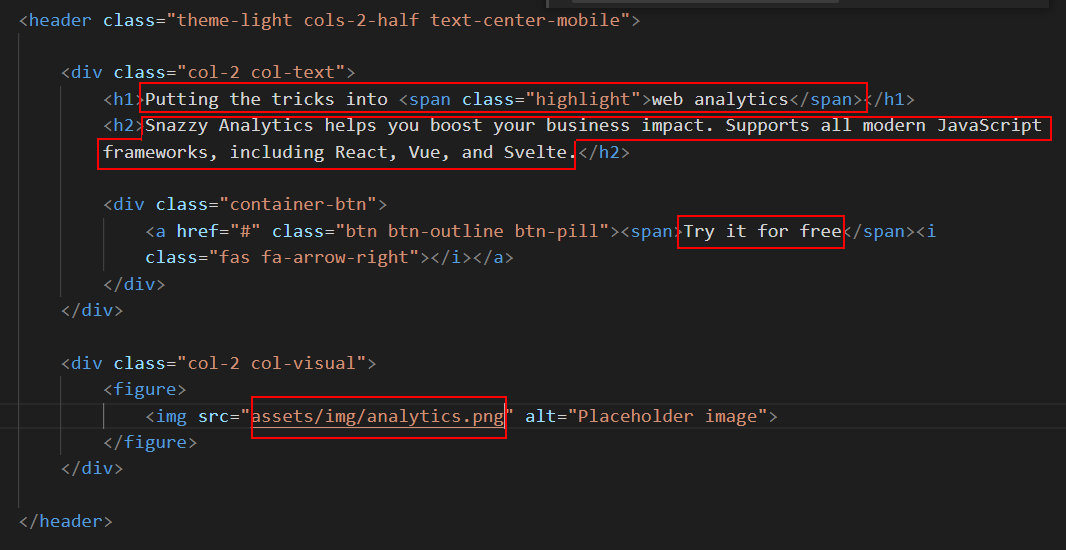
- Paste the copied HTML over the empty <header> tag pair and the comment line above it.
- Update the pasted content with the relevant words from the text.html file and the downloaded fashion.jpg image. See below.
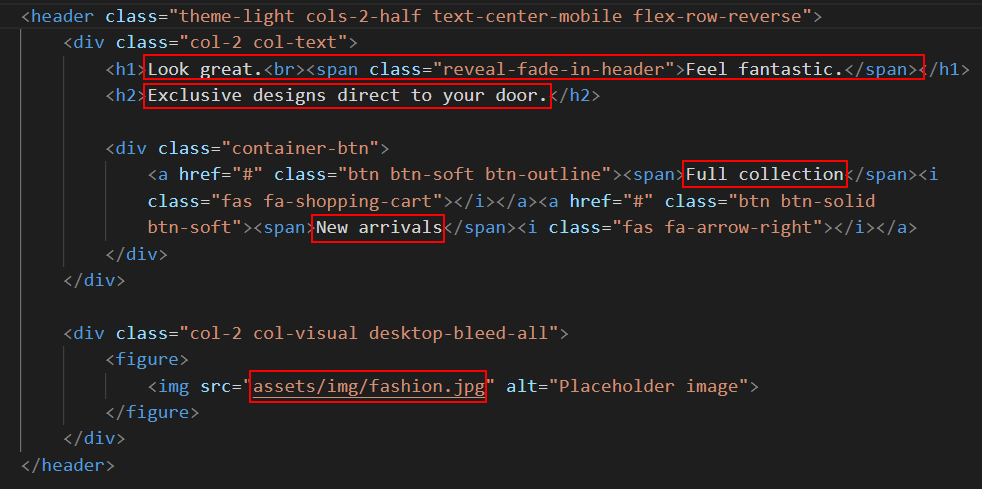 Note that the 'fade-in' effect is applied only to the second line of the <h1> main heading.
Working with the custom-3.css stylesheet
Follow these steps:
- Return to the Lunevedy app and click the CSS button at the bottom-right of the screen.
- In VS Code, in the custom-3.css stylesheet, paste in the copied styles.
- Add the new style rules below.
header h1 { font-family: 'Prata', serif; font-weight: 400; line-height: 1.2 }
Save your index-3.html and custom-3.css files.
✅ All done. Your third hero block is now complete.
The hero-4 block
Your fourth finished hero block should look similar to that shown below.

In VS Code, open the index-4.html and custom-4.css files.
Working with the index-4.html web page
Follow these steps:
- On the home page of Lunevedy, choose the Hero block 2 layout.
- On the Layout menu, choose the following options.
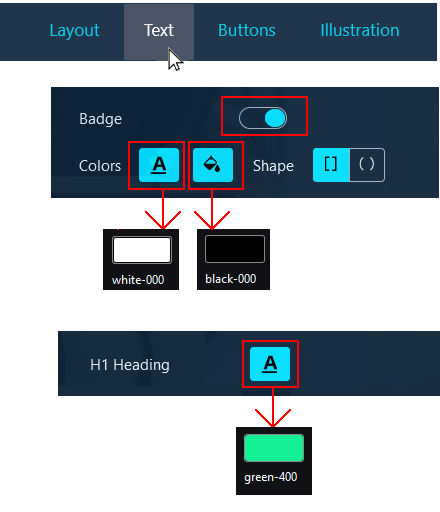
- On the Text menu, choose the following options.
- Click the HTML button near the bottom-right of the screen.
- Switch to VS Code and display the index-4.html web page.
- Paste the copied HTML over the empty <header> tag pair and the comment line above it.
- Update the pasted content with the relevant words from the text.html file and the downloaded hair.png image.
Working with the custom-4.css stylesheet
Follow these steps:
- Return to the Lunevedy app and click the CSS button at the bottom-right of the screen.
- In VS Code, in the custom-4.css stylesheet, paste in the copied styles.
- Add the following new style rules.
header h1 { font-family: 'Playfair Display', serif; letter-spacing: -4px; font-weight: 400; }
Save your index-4.html and custom-4.css files.
✅ All done. Your fourth hero block is now complete.
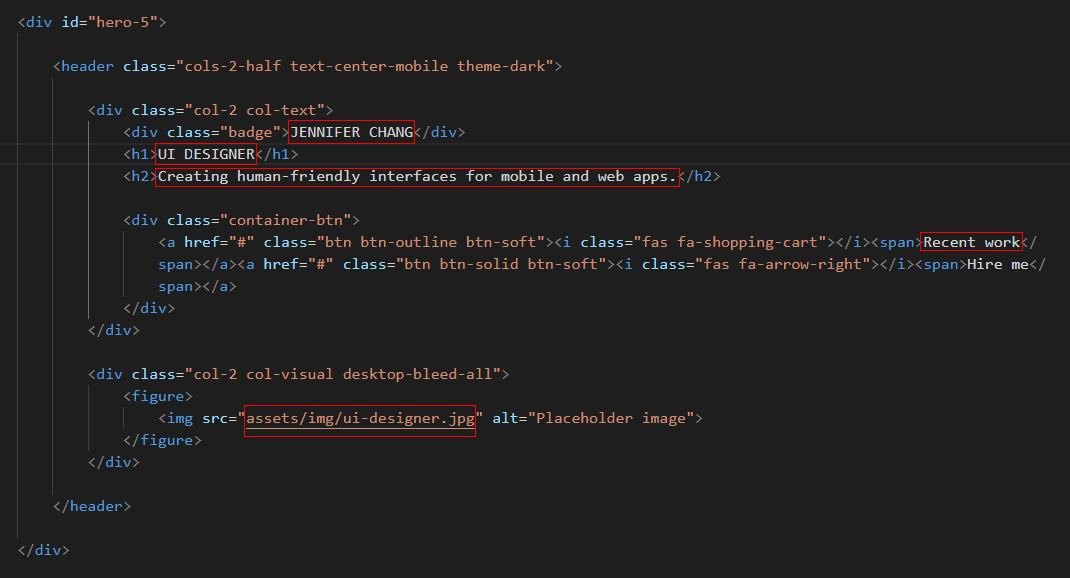
The hero-5 block
Your fifth finished hero block should look similar to that shown below.

In VS Code, open the index-5.html and custom-5.css files.
Working with the index-5.html file
Follow these steps:
- On the home page of Lunevedy, choose the Hero block 2 layout.
- On the Layout menu, choose the following options.
- On the Text menu, choose the following options.
- Switch to VS Code and display the index-5.html web page.
- Paste the copied HTML over the empty <header> tag pair and the comment line above it.
- Update the pasted content with the relevant words from the text.html file and the downloaded ui-designer.jpg image. See below.
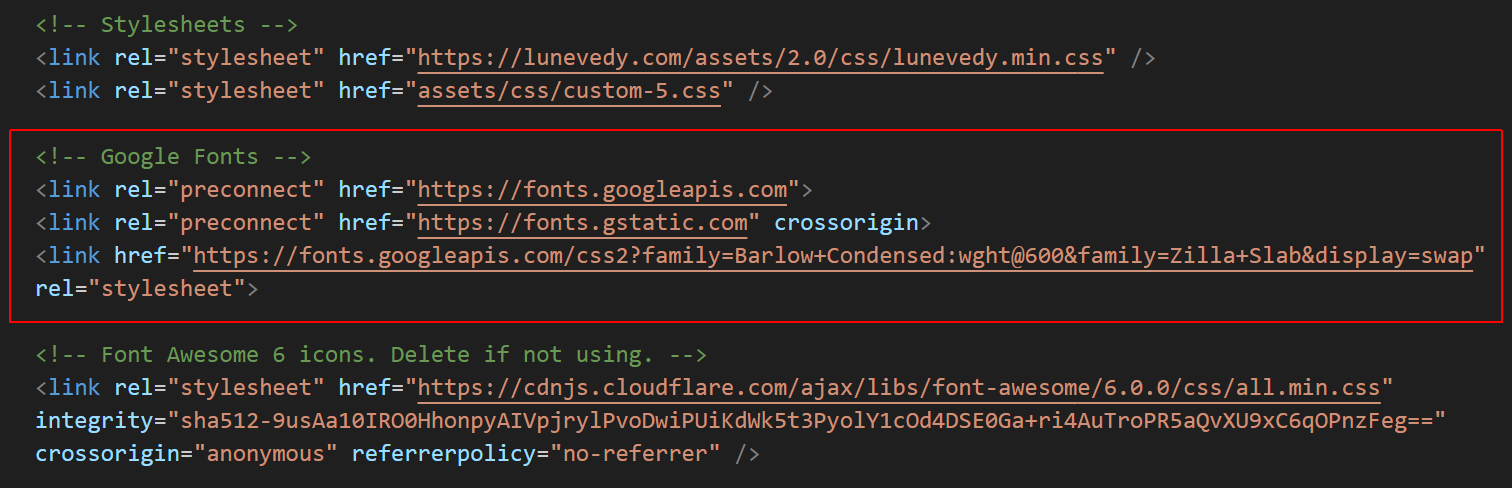
Adding the two Google Fonts
The links for the two Google Fonts (Barlow Condensed and Zilla Slab) are not included in the <head> of the index-5.html web page. Copy and paste the links below.
<link rel="preconnect" href="https://fonts.googleapis.com">
<link rel="preconnect" href="https://fonts.gstatic.com" crossorigin>
<link href="https://fonts.googleapis.com/css2?family=Barlow+Condensed:wght@600&family=Zilla+Slab&display=swap" rel="stylesheet">The relevant part of the <head> in the index-5.html file should now look as shown below.
Working with the custom-5.css stylesheet
Follow these steps.
- Return to the Lunevedy app and click the CSS button at the bottom-right of the screen.
- In VS Code, in the custom-5.css stylesheet, paste in the copied styles.
- Add the new style rules below.
header.theme-dark .badge { text-decoration: underline; text-decoration-thickness: 2px; text-underline-offset: 7px; text-decoration-color: var(--green-400); text-decoration-style: wavy; background-color: black !important; color: #fff !important; } header.theme-dark h1 { font-family: 'Barlow Condensed', sans-serif; font-weight: 600; letter-spacing: 4px; font-size: var(--font-size-xxxl); } header.theme-dark h2 { font-family: 'Zilla Slab', serif; font-weight: 400; }
Save your index-5.html and custom-5.css files.
✅ All done. Your fifth hero block is now complete.
Final touches
For each of your five web pages, replace the name "Mary Smith" in the <head> with your own name.
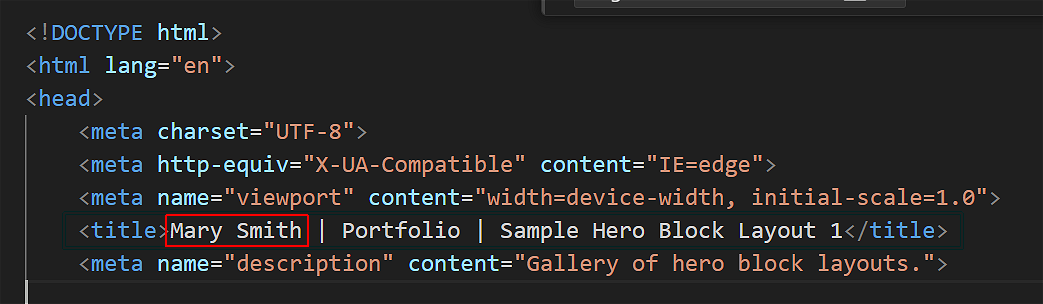
Also update the text in the <title> tag to "Sample Hero Block Layout 1", "Sample Hero Block Layout 2", and so on.
Uploading your project folder to GitHub
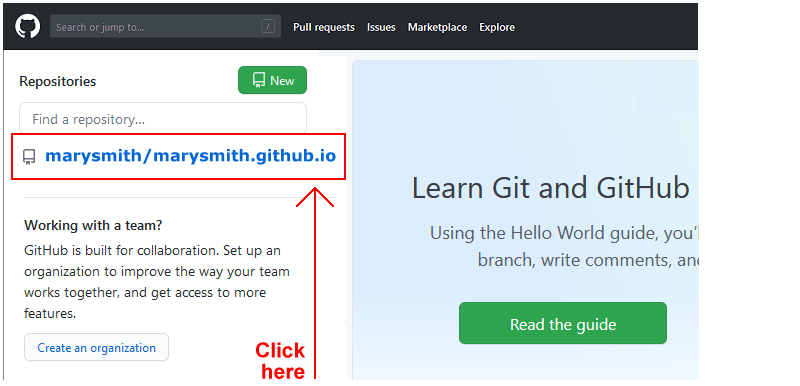
You are now ready to upload your project to your account on GitHub.
- Open a new tab in your web browser and go to GitHub.com. If you are not already signed in to your GitHub account, sign in now.

- On your GitHub home page, click the ‘repo’ that holds your web pages. Its name will look as follows, where username is your chosen username on GitHub.
username.github.io
- On the next GitHub screen displayed, click the portfolio folder.
- With your portfolio folder displayed on GitHub, click Add file button.
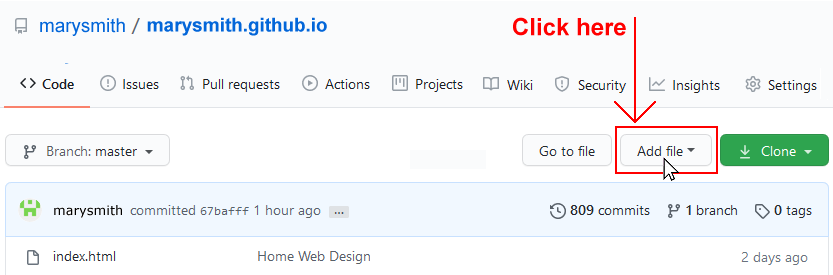
- From the dropdown list displayed, choose the option Upload files.
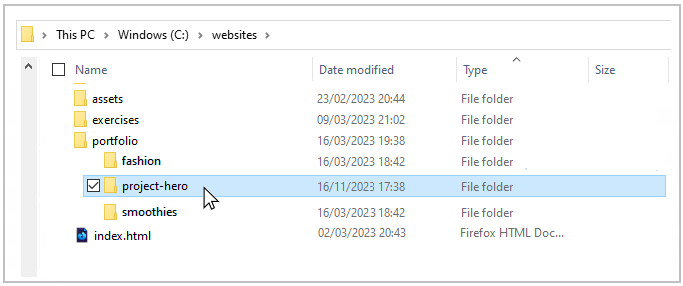
- In File Explorer (Windows) or Finder (Apple Mac), drag-and-drop your 📁 project-hero folder to upload it within your repository on GitHub.
- Scroll down to the bottom of the GitHub screen, and accept or edit the short message (Add files via upload) in the Commit changes box.
- Finally, click the green Commit changes button to upload your files.
Your portfolio project web page is now published on GitHub at a web address similar to the following:
https://username.github.io/portfolio/project-hero/index.html
Or simply:
https://username.github.io/portfolio/project-hero
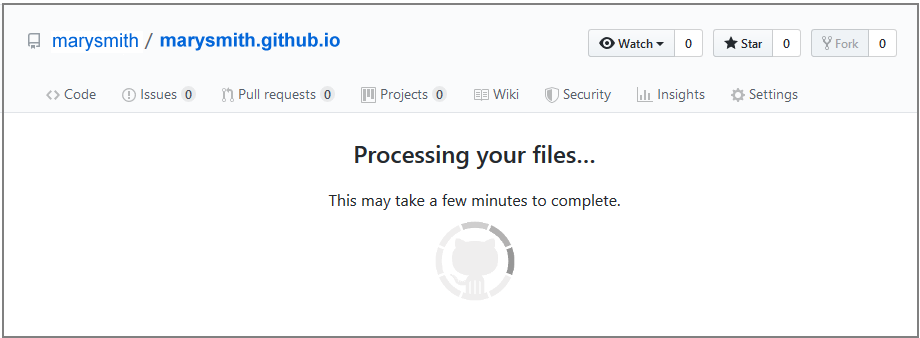
It may take a few minutes for your uploaded files to appear on GitHub.