Contents  >

Responsive Web Design and Fluid Typography

IBAT Next Course

Learning Goals

At the end of this Lesson you will be able to:

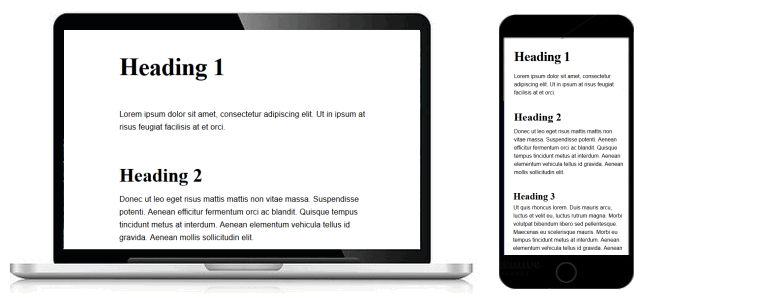
You can view a finished version of this exercise by clicking the image below.

GitHub image

Contents

About fluid typography

Your two work files: base-3.html and base-3.css

Minimum (320px) and maximum (1600px) web page widths

Fluid typography: Browser resets

The fluid typography equation

Adding fluid typography to your headings and paragraph styles

Updating the <head> of your web page

Validating your web page

Validating your stylesheet

Uploading your two files to GitHub

Further resources

About fluid typography

Fluid typography means that the font sizes of text – headings, paragraphs, bulleted lists, menu items – on a web page ‘scale’ (shrink or expand) smoothly according to the width of the user’s viewport (screen).

The animated gif below is taken from an article on the CSS Tricks website that features the widely-used implementation of the fluid typography approach developed by web designer Mike Riethmuller.

fluid typography

Your two work files: base-3.html and base-3.css

To follow this Lesson, open these two files in your text editor:

Next, follow the steps below:

  1. Use the File | Save As command to save your base-2.html file with this new name:   base-3.html   You can now make changes to this new base-3.html file without affecting the base-2.html file from your previous exercise.
  2. In the <head> of your new base-3.html file, change the title as follows:
     <title>Web page with fluid typography</title>
    
  3. Also in the <head>, change the description as follows:
     <meta name="description" content="A sample web page with responsive layout and fluid typography in a linked stylesheet.">   
    
  4. And finally in <head>, change the stylesheet link as follows:
     <link rel="stylesheet" href="base-3.css">
    
  5. You are now finished making changes to your base-3.html file.   Save the file with the File | Save command. Or press the Ctrl key (Windows) or Command ⌘ key (Apple) and press the s (for Save) key.
  6. Switch to the base-2.css file, and use the File | Save As command to save the file with this new name:   base-3.css

You are now ready to work with your new web page (base-3.html) and stylesheet (base-3.css) files.

Minimum (320px) and maximum (1600px) web page widths

To use fluid typography in your web pages, you need to decide on two values:

You will use both the 320px and 1600px values in the so-called fluid typography equation when setting fluid values for the font-size rule in CSS.

Fluid typography: Browser resets

Before continuing, you need to set your chosen value for the maxumum viewport (screen) width in the CSS file. Add the following line to the browser resets section at the top of your CSS file:

/* ==== BROWSER RESETS  ==== */
* { padding: 0; margin: 0; border: 0; font-weight: normal; font-size: 16px }
body, html { height: 100% } 
body { max-width: 1600px; margin: 0 auto }

The fluid typography equation

You are now ready to use the fluid typography equation from Mike Riethmuller.

“Fluid Type” i̶n̶s̶p̶i̶r̶e̶d̶ stolen from @MikeRiethmuller now live on @CodePen blogs. Including “Fluid Modular Scale!” pic.twitter.com/0yJk8Iq8fR

— Chris Coyier (@chriscoyier) October 27, 2016


At first sight, the fluid typography equation looks complex. But it becomes easy to work with if you remember the following two points:

For example, in the case of paragraph text, you might:

Your fluid typography equation for text paragraphs would then be as shown below.

p {
    font-size: calc(15px + (18 - 15) * ((100vw - 320px) /(1600 - 320)));
}

As for the other values in the equation:

Adding fluid typography to your headings and paragraph styles

Next, apply the following fluid typography styles to your stylesheet.

For the h1 selector, change the current font-size value to the following:

 h1 {
    font-family: serif;
    font-weight: bold;
    font-size: calc(42px + (64 - 42) * ((100vw - 320px) / (1600 - 320)));
    letter-spacing: -1px;
 }

For the h2 selector, change the current font-size value to the following:

 h2 {
    font-family: serif;
    font-weight: bold;
    font-size: calc(32px + (48 - 32) * ((100vw - 320px) / (1600 - 320)));
 }

For the h3 selector, change the current font-size value to the following:

 h3 {
    font-family: serif;
    font-weight: bold;
    font-size: calc(22px + (28 - 22) * ((100vw - 320px) / (1600 - 320)));
 }

Finally, for the p selector, change the current font-size value to the following:

 p { 
    font-family: serif;
    font-weight: bold;
    font-size: calc(15px + (18 - 15) * ((100vw - 320px) / (1600 - 320)));
 }

Updating the <head> of your web page

Before you validate your web page and upload it to GitHub, ensure the following details are correct within the <head> of your base-3.html file.

GitHub image

Validating your web page

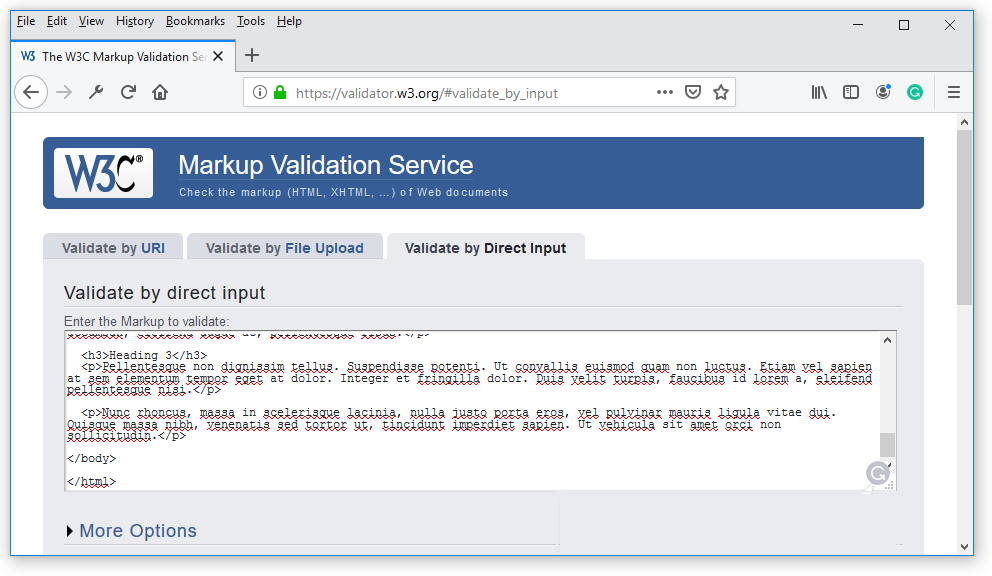
To check the HTML in your web page is correct or valid, use the official W3C Markup Validation Service as follows.

  1. Go to this web page: https://validator.w3.org.
  2. Click the Validate by Direct Input tab. Tutorial RWD: Media Queries
  3. Select your entire HTML file (both <head> and <body>), and copy-and-paste it into the box named Enter the Markup to validate. Tutorial RWD: Media Queries
  4. Click the Check button.
  5. If you see any errors, return to your base-3.html file in your text editor, fix the errors, save the file, and copy-and-paste the entire file again.  In the HTML Validator, click the Back button of your web browser to again display the Validate by Direct Input tab. Click once in the tab and paste in your corrected HTML file. Your new, pasted-in file will replace the earlier version. Finally, click the Check button.

Validating your stylesheet

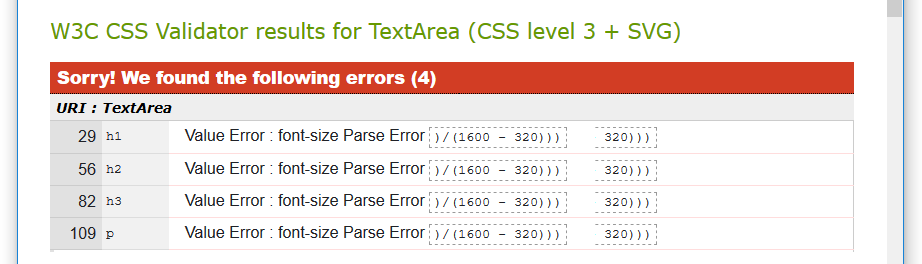
To check your CSS is correct, use the official W3C CSS Validation Service. Follow these steps.

  1. Go to this web page: https://jigsaw.w3.org/css-validator.
  2. Click the By direct input tab. Tutorial RWD: Media Queries
  3. Copy and paste your CSS file into the box named Enter the CSS you would like validated.
  4. Click the Check button.
  5. If you see any errors (other than those related to the fluid typographic equation, as shown below), return to your base-3.css file in your text editor, fix the errors, save the file, and copy the entire file again. Tutorial RWD: Media Queries
  6. In the CSS Validator, click the Back button of your web browser to again display the By direct input tab. Click once in the tab and paste in your corrected CSS file. Your new, pasted-in file will replace the earlier version. Finally, click the Check button.

Uploading your two files to GitHub

After validating your web page and stylesheet, you are now ready to upload them to your account on GitHub.

  1. Sign in to your account at GitHub.com. At the left of the screen, you can see a list of your repositories. Upload to GitHub
  2. On your GitHub home page, click the name of the repository that holds your web pages. Its name will look as follows, where username is your chosen username on GitHub.   username.github.io   GitHub Upload
  3. On the next screen displayed, near the centre of the screen, click the Upload files button. Project Animation Google Fonts
  4. Select or drag-and-drop the two files base-3.html and base-3.css to upload them to your GitHub account. Project Animation Google Fonts
  5. After uploading your files, scroll down to the bottom of the screen, enter a short message in the Commit changes box and click the Commit changes button.

Your web page is now published on GitHub at a web address similar to the following, where username is the username you have chosen for your GitHub account:

https://username.github.io/base-3.html

It may take a few minutes for your uploaded files to appear on GitHub.

Further resources

Fluid typography
by Geoff Graham on CSS-Tricks

What is fluid typography and should I be using it?
by Kate Montgomery on Medium

Fluid typography examples
by Mike Riethmuller at MadeByMike

Flexible typography with CSS locks
by Tim Brown at the Adobe Fonts Blog

Get the balance right: Responsive display text
by Richard Rutter on 24Ways

Video: Fluid typography explained
from Jesse Hemminger

Video: Fluid typography – basic CSS
from Tutor SC

Video: Advanced fluid typography
from CSSConf Australia


Return to Contents.