Learning Goals
At the end of this Tutorial, you will be able to:
- Create style HTML tables.
- Using the addRow and deleteRow methods.
- Populate a table from an array of objects.
Tables in HTML
A table is a structured set of data made up of rows (left-to-right) and columns (top-to-bottom).
In HTML:
- A table is enclosed inside a pair of <table> and </table> tags.
- A table row is enclosed inside a pair of <tr> and </tr> tags.
- And each single cell on a table is enclosed inside a pair of <td> and </td> tags.
See the simple example below.
<table>
  <!-- first row -->
  <tr>
     <td>Row 1, Cell 1</td>
     <td>Row 1, Cell 2</td>
     <td>Row 1, Cell 3</td>
  </tr>
  <!-- second row -->
  <tr>
     <td>Row 2, Cell 1</td>
     <td>Row 2, Cell 2</td>
     <td>Row 2, Cell 3</td>
  </tr>
</table>
In practice, tables typically have a thead section (that contains the column headings) and a tbody section (that holds the table data).
Note that the cells in the head are wrapped in th rather than td trags.
<table>
  <!-- table header -->
  <thead>
  <tr>
     <th>Header 1</th>
     <th>Header 2</th>
     <th>Header 3</th>
  </tr>
  </thead>
  <tbody>
  <!-- first row -->
  <tr>
     <td>Row 1, Cell 1</td>
     <td>Row 1, Cell 2</td>
     <td>Row 1, Cell 3</td>
  </tr>
  <!-- second row -->
  <tr>
     <td>Row 2, Cell 1</td>
     <td>Row 2, Cell 2</td>
     <td>Row 2, Cell 3</td>
  </tr>
  </tbody>
</table>
As with other HTML elements, you can apply CSS styles to tables. Typically, CSS styles are applied to the borders and background colours.
Adding CSS to a table
Follow these steps to add some basic styling to three sample tables.
- Open and save on your computer the following file: exercise-table-1.html This contains three sample tables inside a div with a class of .container-table.
- Add a class of data-table to all three tables.
- In the style section in the head of the web page, add this class with the style rules below.
/* All tables */ .data-table { border-collapse: collapse; font-size: 18px; width: 100%; overflow: scroll; margin-bottom: 56px; border: solid 1px #888; box-shadow: 8px 8px 8px #888; } - For the cells of the tables, add these styles.
.data-table th, .data-table td { padding: 8px 18px } - Next, add some styles to make each of the tables look a little different.
Begin by adding a new class of table-lines to the first of the three tables. And then add this class to the head of the web page.
/* Tables with horizontal lines under rows */ .table-lines { background-color: #fffceb } .table-lines tr { border-bottom: solid 1px #222 } - To the second table, add a class of .table-theme-light. And then add the class below to the style section in the head of the web page.
/* Tables with light theme */ .table-theme-light thead tr th { background-color: lightgray } .table-theme-light tr:nth-child(odd) { background-color: #fff } .table-theme-light tr:nth-child(even) { background-color: #E1E4E7 } - Finally, add a class of .table-theme-dark to the third table. And then add the class below with the others.
/* Tables with dark theme */ .table-theme-dark { color: #fff } .table-theme-dark thead tr th { background-color: #000 } .table-theme-dark tr:nth-child(odd) { background-color: #0e2439 } .table-theme-dark tr:nth-child(even) { background-color: #1f364d } - Save your web page and view in your web browser. Your tables should look as shown below.
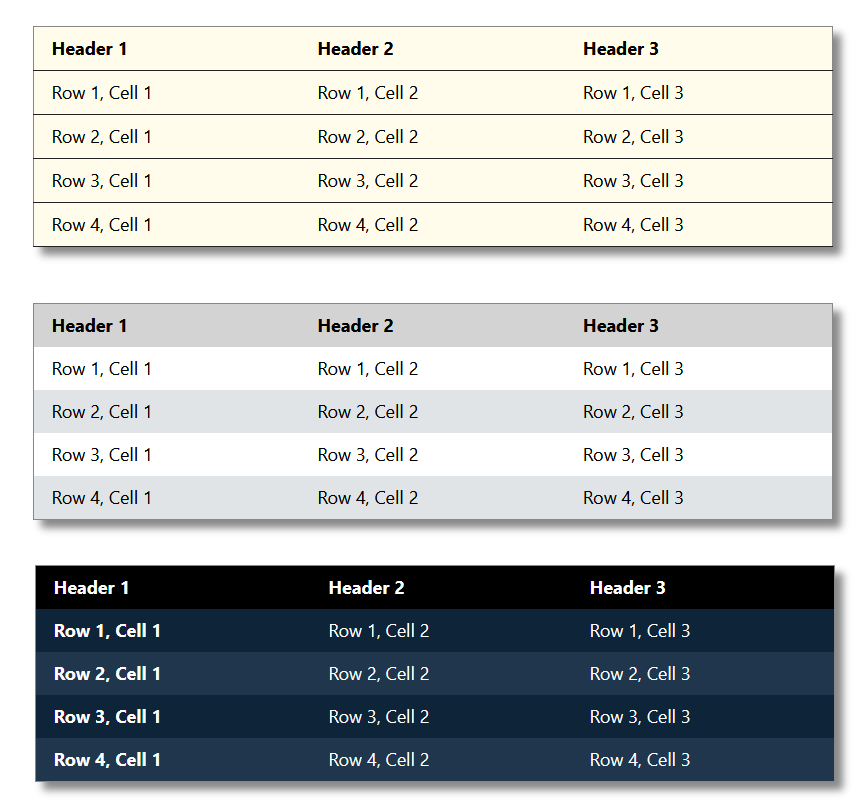
By using the CSS pseudo classes of :nth-child(odd) and :nth-child(even), you have created so-called zebra tables. That is, tables with alternating rows with different background colours.
Three extra styles you may want to add to your tables are the following:
- Left-align headings: By default, column headings in the thead are centre-aligned. You can left-align all cells as follows.
.data-table th, .data-table td { padding: 8px 18px; text-align: left } - Highlight first column: You can use the pseudo class of :hover to highlight the content of the first column of a table - for example, to make the text bold. Try adding this style rule.
.table-theme-dark td:first-of-type { font-weight: 700 } - Highlight active rows: You can highlight the row of a table that the user is currently hovering over with this rule.
.table-theme-dark tr:hover { background-color: red }
Lastly, let's add some visual interest to the area of the web page behind the table. So-called mesh backgrounds are very popular. See this website.
You can add a mesh background to the web page as follows.
- Go to the Mesher website.
- Choose your preferred background colour combination.
- Click the Copy CSS button.
- Paste the CSS to the .container-table class.
That's it. You have completed the first table exercises.
Deleting table rows with JavaScript
JavaScript has a deleteRows() method for removing a row from a HTML table. The following exercise provides an example.
- Open and save on your computer the following file: exercise-table-2.html This contains a sample table with four rows and three cells in each row - Student ID, First Name and Last Name.
- In the thead row, add the fourth cell below.
<th>Action</th>
- To each of the four thead rows, add this fourth cell.
<td><a class="btn">Delete</a></td>
- Include within each button hyperlink the relevant Student ID. For example:
<a class="btn" id="1234">Delete</a></td>
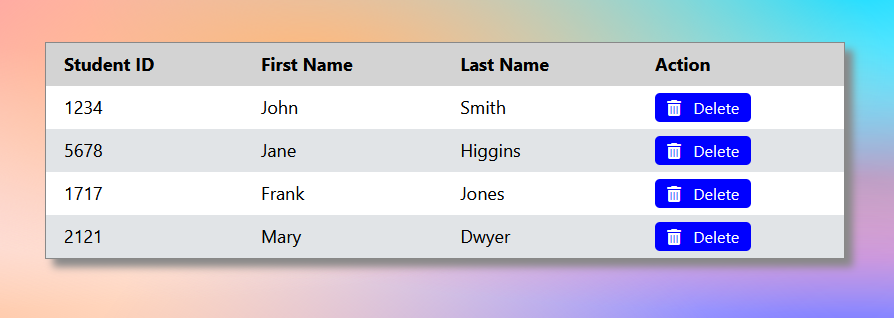
- Add the CSS styles of a.btn and a.btn:hover. And add a suitable Font Awesome icon to the button.
- Save your table and view it in your web browser. It should look as shown below.
The next steps are to add the JavaScript code for removing a selected row from the table.
- Before adding any JavaScript, add the style rule below to the CSS for the table buttons.
.table-theme-light td a.btn > * { pointer-events: none; }This prevents an event being triggered when the user clicks on any text or icon element inside the button. - Add an id of myTable to the sample table.
- Add a script tag to the bottom of the web page and enter the following code.
let all_btns = document.querySelectorAll('#myTable .btn');

all_btns.forEach(el => el.addEventListener('click', event => {
  event.preventDefault();
  console.log("Clicked button");
  // get button id
  btn_id = event.currentTarget.id;
  console.log("Button ID: "+btn_id);
  // deleteRow(btn_id);
}));
Check your DevTools console to verify your code works correctly. - Uncomment the last line above and add the function below.
function deleteRow(btn_id) { const rows = document.querySelectorAll("#myTable tr"); for (let i = rows.length; i--;) { if(rows[i].innerHTML.includes(`id="${btn_id}"`)) { rows[i].parentNode.removeChild(rows[i]); } } } - Save your web page and view in your web browser. Verify that your code works correctly. Remove any console.log statements.
Adding table rows with JavaScript
JavaScript has an addRows() method for add a new row to a HTML table. The following exercise provides an example.
- Open and save on your computer the following file: exercise-table-3.html
- Under the sample table, add the following HTML for the button.
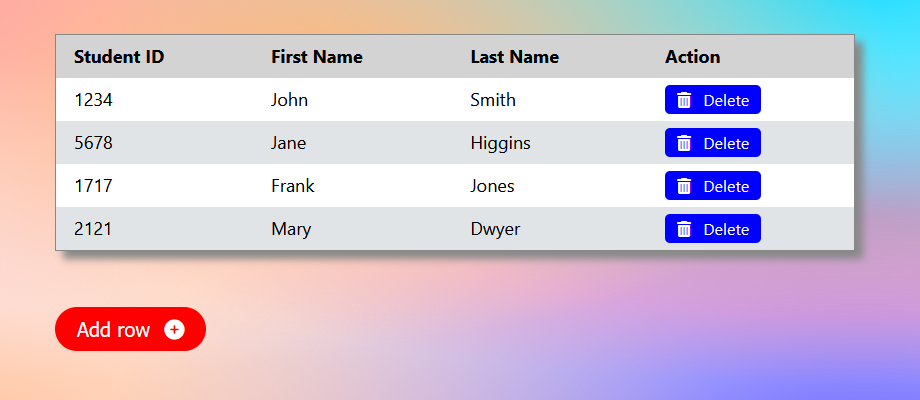
<p><button class="add-row" onclick="addRow()">Add row <i class="fa-solid fa-circle-plus"></i></button></p>
- Add some CSS for the new button. Save your table and view it in your web browser. It should look as shown below.
- You will need a Student ID for each new you you add. So add this function at the bottom of your JavaScript code.
function getRandomInt(min, max) { min = Math.ceil(min); max = Math.floor(max); return Math.floor(Math.random() * (max - min + 1) + min); } - Begin adding the function code for adding a new row to the table as follows.
function addRow() { let table = document.getElementById("myTable"); // Create an empty <tr> element and add it to the last position of the table let row = table.insertRow(-1); // Insert new empty cells (<td> elements) in new <tr> element: let cell1 = row.insertCell(0); let cell2 = row.insertCell(1); let cell3 = row.insertCell(2); let cell4 = row.insertCell(3); } - Now add the code for populating the first three cells of every new row with data.
 // Add content to the new cells:
  let student_id = getRandomInt(4000, 9000);
  cell1.innerText = student_id;
  cell2.innerText = "First Name here";
  cell3.innerText = "Last Name here";
- Finally, add the code for the Delete button.
cell4.innerHTML = "<a class=\"btn\" id=\""+student_id+"\" onclick=\"deleteRow("+student_id+")\"><i class=\"fa-solid fa-trash-can\"></i>Delete</a>"; - Save your web page and verify your code works correctly.
Populating a table from an array
In his next exercise you will populate an HTML table with data stored in an array.
- Open and save on your computer the following file: exercise-table-4.html The sample table contains only a thead section and no tbody.
- In the JavaScript code, paste in the following array of objects.
const arrStudentData = [
    {id: "1224", firstname: "John", lastname: "Smith"},
    {id: "5678", firstname: "Jane", lastname: "Higgins"},
    {id: "1717", firstname: "Frank", lastname: "Jones"},
    {id: "2121", firstname: "Mary", lastname: "Dwyer"}
];
This is data that will be used to populate the table. - Update the table HTML by adding the following line just before the closing </table> tag as follows.
<tbody id= "studentData"></tbody>
This is the part of the table that will be updated by JavaScript. - Add the following JavaScript function.
 function populateTable(){
 let tableContent = "";
 let delBtn = "<a class=\"btn\" onclick=\"deleteRow(this)\"><i class=\"fa-solid fa-trash-can\"></i>Delete</a>";
   for(var i in arrStudentData){
      tableContent += "<tr>";
      tableContent += "<td>" + arrStudentData[i].id +"</td>"
         + "<td>" + arrStudentData[i].firstname +"</td>"
         + "<td>" + arrStudentData[i].lastname +"</td>"
         + "<td><a class=\"btn\" onclick=\"deleteRow("+arrStudentData[i].id+")\"><i class=\"fa-solid fa-trash-can\"></i>Delete</a></td>";
         tableContent += "</tr>";
   }
This code creates an HTML string that will become the content of the table. - To this function add these lines to update the HTML in the web page.
document.getElementById("studentData").innerHTML = tableContent; - Update the Button content after it has been clicked by the user.
document.getElementById("btn_populate").innerHTML = "Refresh Table <i class=\"fa-solid fa-circle-plus\"></i>"; - Finally, update the following line within the deleteRow() function.
- Save your web page and verify your code works correctly.
if(rows[i].innerHTML.includes(btn_id)) {