Learning Goals
By the end of this Tutorial, you will be able to:
- Use an AI prompt to create and progressively extend a small web app.
- Organise app files, prompts and generated pages in separate folders.
- Create a semantic hero block containing an H1 and an optional H2.
- Explore responsive minimum heights, alignment, font families and letter spacing.
- Choose heading and background colours from the Tailwind CSS palette.
- Create a linear gradient using two colours and a direction.
- Inspect the HTML and CSS generated by your app.
You will use JavaScript to power the app, but the focus of this lesson is the HTML and CSS it produces. You do not need to understand every line of the generated JavaScript to complete the tasks.
Creating your project folders
Begin by organising your files in VS Code.
- Open your existing websites folder (or whatever folder you are storing you Frontend Development files in).
- In the Explorer panel, click once on the index.html file to select the highest level of this folder.
- Click the New Folder icon and name the new folder apps.
- Right-click apps, choose New Folder, and name it hero.
- Inside hero, create a folder named output.
- Also inside hero, create a folder named prompts.
Use lowercase letters for these names.
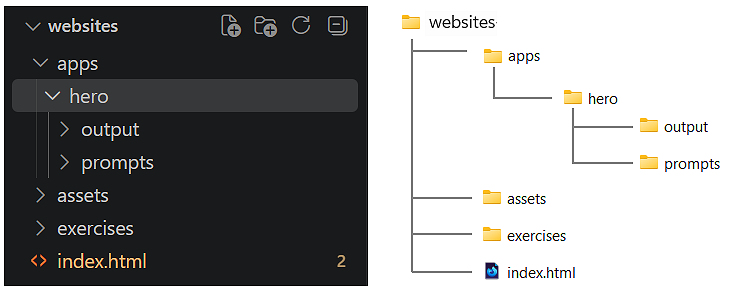
| Folder | What you will save here |
|---|---|
websites/apps/hero/ |
The four versions of your Hero Generator app |
websites/apps/hero/output/ |
Finished hero pages created using Copy HTML |
websites/apps/hero/prompts/ |
The instructions you give to your preferred AI. |
Important: the app and its output are different files. The app contains controls and JavaScript. Its output is the finished hero page containing your chosen text and styles.
Downloading your prompt files
Download these two supplied files and save them in websites/apps/hero/prompts:
If your browser saves downloads automatically, move the files from Downloads into your apps/hero/prompts subfolder. Open both files in VS Code.
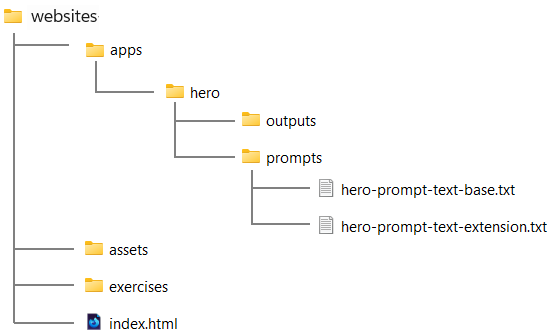
The base prompt creates the first version of your app. The extension prompt provides a structure for requesting the further versions with more features.
Building Version 1
Your first app will have editable headings and four checkboxes: Dark appearance, Centre text, Minimum height and Show subheading.
- In VS Code, open hero-prompt-text-base.txt.
- Select and copy all its text.
- Open your AI in your browser and start a new project (if available) and a conversation.
- Paste the prompt and submit it.
- When the response is complete, copy the entire HTML code block.
- Return to VS Code. Inside apps/hero, create app-hero-text-v1.html.
- Paste the code and save the file.
- Open the HTML file in your browser, or use Live Server if it is already installed in VS Code.
Copy only the HTML code, beginning with <!DOCTYPE html> and ending with </html>. Do not copy Markdown backticks or the explanation below the code.
Your browser needs an internet connection to load hosted Tailwind CSS.
Try the controls
- Click the H1 and replace its text with Design your next adventure.
- Change the H2 to Create a hero block with your own text and styles.
- Turn Dark appearance on and off.
- Turn Centre text on and off.
- Turn Minimum height off. Notice how the content and padding now determine the height.
- Turn it back on. At wider viewports, the hero has a minimum height of 85% of the viewport. Below 768px, its minimum height is 480px.
- Hide the H2, then restore it. Your edited text should remain.
- Narrow the browser window. Check that the headings wrap without clipping.
The app uses a minimum height, rather than a fixed height. Long text can therefore make the hero taller.
Saving your first generated web page
- In the app, choose the text and settings you want.
- Click Copy HTML, at the bottom-right of the browser viewport.
- In VS Code, create hero-text-v1.html inside apps/hero/output.
- Paste the copied code and save the file.
- Open this new file in your browser.
You should see your finished hero without the generator controls. If automatic copying is unavailable, use the app's manual-copy textarea.
Open the output file in VS Code and locate its <header>, <h1>, optional <h2> and styles in the <head>.
The meta description supplied by the prompt is instructional placeholder text. Replace it with a short description of your actual page, and give the page a suitable <title> before publishing.
Keep the app file. To build the next version, you must supply app-hero-text-v1.html, not the page you just saved in the output folder.
Changes made through the app's controls are not automatically saved into the app file. Copy and save any finished design you want to keep before refreshing or closing the browser.
Extending your app
Each stage starts with the current working app and adds one group of features.
| Stage | Supply this app | Save the response as |
|---|---|---|
| Version 2 | app-hero-text-v1.html |
app-hero-text-v2.html |
| Version 3 | app-hero-text-v2.html |
app-hero-text-v3.html |
| Version 4 | app-hero-text-v3.html |
app-hero-text-v4.html |
For each stage:
- Open hero-prompt-text-extension.txt and use Save As to create a working copy in the prompts folder, such as hero-prompt-text-v2.txt.
- Set the current and next app filenames. Remove the square brackets around example filenames.
- Replace the entire NEW FEATURE section with the feature instructions given below.
- Keep the instruction to return the complete updated HTML in one code block.
- Delete all old code after CURRENT CODE:. Paste the complete contents of your current working app there instead.
- Save the prompt, copy all its text and submit it to your AI.
- Save the returned HTML under the new app filename in apps/hero.
- Open and test the new file. Keep the previous version.
Use the same chat if convenient, but always supply your current code. This includes any fixes or changes you have made in VS Code.
If something fails, describe the control you used, what happened and what you expected. For example: “When I hide and restore the H2, its edited text disappears. Preserve that text and return the complete corrected HTML.” Save and retest the correction before continuing.
Building Version 2: fonts and letter spacing
Create hero-prompt-text-v2.txt using the extension process above. Set the filenames to app-hero-text-v1.html and app-hero-text-v2.html.
Use the following NEW FEATURE instructions:
Add separate H1 and H2 text-effect groups.

For each heading, add a “Serif font” checkbox. Unchecked uses Tailwind font-sans; checked uses font-serif. Both are unchecked by default. Apply these through named classes with @apply in the shared hero stylesheet.

For each heading, add a native range slider labelled “Letter spacing”. Use a minimum of -0.05em, a maximum of 0.10em and a step of 0.005em. Default H1 to -0.05em and H2 to -0.025em.

Display the current value with its em unit beside each slider. Update the preview immediately while dragging. Store numeric slider values in the settings object.

Apply letter spacing through heading-specific CSS rules in a dedicated style element in the head. Include those rules in exported HTML; do not use inline styles.

Disable H2 effect controls when the subheading is hidden. Preserve their settings and the edited heading text when it is restored.
Supply V1's complete app code, generate the result and save app-hero-text-v2.html.
Test and inspect
- Select a serif font for H1 while leaving H2 sans-serif. Then reverse the choices.
- Move each slider slowly. Negative letter spacing brings letters closer together; positive spacing spreads them apart.
- Hide and restore the subheading. Its text and settings should remain.
- Check that the original four controls still work.
- Copy a design into output/hero-text-v2.html and open it in your browser.
In the output code, find a rule similar to:
.hero h1 {
    letter-spacing: -0.05em;
}
The em unit relates this spacing to the heading's font size. Compare it with font-serif and font-sans inside the named CSS rules.
Building Version 3: solid colours
Create hero-prompt-text-v3.txt. Set the current app to app-hero-text-v2.html and the new app to app-hero-text-v3.html.
Use these NEW FEATURE instructions:
Add a shared Tailwind colour palette for independently selecting the hero background, H1 colour and H2 colour.

Provide Background, H1 and H2 target buttons, with Background selected initially. Clearly show the active target and its selected colour name.

Display the Tailwind colour families in labelled rows and shades 50–950 in labelled columns. Include black and white separately. Give swatches accessible colour names, keyboard support, visible focus and a clear selected state. Allow the palette itself to scroll horizontally on narrow screens without widening the page.

Clicking a swatch changes only the active target.

Rename the existing checkbox “Dark appearance preset”. Changing it resets all three colours: light uses slate-50, slate-900 and slate-700; dark uses slate-900, slate-50 and slate-300 for background, H1 and H2 respectively. Subsequent palette choices override individual colours. Other controls must not reset custom colours.

Disable the H2 target while H2 is hidden. If H2 was selected, select Background instead. Preserve its colour when restoring it.

Store colour names in the settings object. Apply colours using Tailwind palette variables in a shared style element in the head, with rules that override the preset styles. Include these rules in exported HTML. Do not use inline styles.

Use solid colours only. Do not add gradients or custom colour inputs.
Supply V2's complete app code and save the generated app-hero-text-v3.html.
Test and inspect
- Select Background, then choose slate-900.
- Select H1, then choose white.
- Select H2, then choose slate-300.
- Change alignment and font family. The colours should remain.
- Toggle the appearance preset and check that it resets all three colours.
- Test the palette on a narrow screen and using the keyboard.
- Save a finished design as output/hero-text-v3.html.
Find the colour rules in its head. For example:
.hero.hero-dark h1 {
    color: var(--color-white);
}
var() reads a CSS custom property. Here, Tailwind supplies the colour value. Choose combinations that keep both headings clearly readable against the background.
Building Version 4: linear gradients
Create hero-prompt-text-v4.txt. Use app-hero-text-v3.html as the current app and app-hero-text-v4.html as the new app.
Replace the previous NEW FEATURE section completely. In particular, remove its “solid colours only” instruction.
Add a “Gradient background” checkbox, unchecked by default.

When unchecked, retain solid backgrounds and the Background colour target.

When checked, replace Background with Start colour and End colour targets using the existing palette. Show a Direction dropdown with four choices: Left to right (to right, default), Right to left (to left), Top to bottom (to bottom), and Bottom to top (to top).

On first enabling the gradient, use the current solid colour as its start colour and blue-500 as its end colour. Preserve both gradient colours and direction when switching it off and back on.

Keep H1/H2 colour selection working. Ensure the active palette target is always visible and enabled. If switching modes hides the active target, select Start colour in gradient mode or Background in solid mode. Use the same fallback when hiding an active H2 target.

Apply CSS linear-gradient() using Tailwind colour variables in the shared colour stylesheet in the head. Include it in exported HTML and do not use inline styles.

Switching back to solid mode must set background-image to none and restore the saved solid colour.

The Dark appearance preset should reset the saved solid background and heading colours, while preserving gradient colours, direction and whether gradient mode is enabled.

Update immediately and preserve all existing features.
Supply V3's complete code and save the generated app-hero-text-v4.html.
Test and inspect
- Select Gradient background.
- Set Start colour to blue-700 and End colour to purple-900.
- Set both headings to a readable light colour.
- Try all four directions and observe where the start colour appears.
- Switch the gradient off. Your saved solid background should return.
- Switch it back on. Your gradient colours and direction should remain.
- Test the appearance preset and the H2 visibility control.
- Save the finished design as output/hero-text-v4.html and compare it with the preview.
You should find CSS resembling:
background-image: linear-gradient(
    to right,
    var(--color-blue-700),
    var(--color-purple-900)
);
The direction comes first, followed by the start and end colours. A CSS gradient is a background image even though it does not require an image file.
Inspecting your generated HTML and CSS
Open your four output files in VS Code. For each one, check:
- A semantic
<header>contains the H1 and, when enabled, the H2. - The hosted Tailwind script appears in the head.
- Named CSS classes connect the HTML to rules in style elements.
- Tailwind utilities are grouped using
@apply. - The editor controls and
contenteditableattributes are absent. - The browser result matches the design you copied.
Replace the placeholder title and description in each output page. Try a long heading and a narrow viewport to check wrapping.
Your app files remain directly in apps/hero. Your four finished pages are in apps/hero/output. Keep all four versions so you can compare how the HTML and CSS have developed.
Updating your website home page
- Open index.html in your main websites folder.
- Add these links to your existing list of exercises:
<p><a href="apps/hero/app-hero-text-v4.html">Hero Block Generator</a></p>

<p><a href="apps/hero/output/hero-text-v4.html">My generated hero block</a></p>
- Save the home page and test both links in your browser.
The first link opens your interactive app. The second opens a finished page produced by it.
Publishing and checking your work
Use your usual GitHub publishing workflow to upload the updated home page and apps folder to your website repository. Preserve the folder structure.
After publishing, follow both links from your live home page. Check the app controls and Copy HTML, then check the finished hero at wide and narrow viewport sizes.
If your site uses the standard GitHub Pages user-site address, the app will be at a path like:
https://username.github.io/apps/hero/app-hero-text-v4.html
Use your own site's address if it differs.
✅ You have completed this Tutorial: four versions of a Hero Block Generator, four exported pages, and a reusable process for extending an app through focused prompts.