Learning Goals
At the end of this Tutorial, you will be able to:
- Describe the purpose of Google Stitch 2.0 and its role in a professional design-to-code pipeline.
- Configure a new Stitch project using the Natural Language UI and select the appropriate model engine.
- Use the Infinite Canvas to view and compare multiple design iterations simultaneously.
- Understand how the Obsidian Ember design system and the design.md file establish visual consistency.
- Generate design variants and use Reference Docking to guide future refinements.
- Activate Live Mode for real-time, voice-activated design collaboration.
- Export finished designs to Claude Code, Figma, or other developer tools.
Introduction to Stitch 2.0
Google Stitch 2.0 is a browser-based design environment powered by Gemini models. It is engineered to enforce stylistic guardrails for front-end development by:
- Enforcing visual consistency through a
design.mdfile markdown file that contains the client organisation's design system rules. - Eliminating visual cliches, often referred to as “AI slop”.
The optimised design-to-code workflow
Here is a high-efficiency workflow for modern web development that combines the strengths of visual AI and agentic coding agents.
- Inspiration Phase: If your client does not already have a specific set of corporate style rules, identify a high-quality design from a website such as the following:
- Dribbble: For high-concept UI trends.
- Godly: For curated, high-end web aesthetics.
- Pinterest: Particularly effective for landing page layouts. Once a preferred style is identified, Pinterest’s recommendation engine is excellent for sourcing additional, similar references.
- motionsites.ai: Web pages with accompanying prompt libraries.
- Refinement Phase: Use Stitch's "Variants" and "Explore" tools to iterate on the layout.
- Export Phase: Access the "More" menu and select an option to export the generated front-end code.
By resolving the visual layer within Stitch first, developers significantly reduce token expenditure in subsequent steps. Coding agents no longer need to perform expensive, iterative CSS “guesswork” to achieve a professional look.
The design.md design configuration file
The design.md file is a markdown document that serves as your project’s visual blueprint.
If your client already has a set of such style rules, you can create a design.md file, add the rules to it, and upload it to Stitch.
If not, Stitch can generate a design.md file based on the visual 'vibe' of your client's business type.
Stitch uses this file to establish granular control over the following configurable visual parameters:
- Seed Colors: Definition of Primary, Secondary, Tertiary, and Neutral palettes.
- Typography: Centralised font selection and hierarchy settings.
- Corner Radius: Global control over UI “roundness,” from sharp professional edges to modern, pill-shaped components.
- Template divergence: Explicit instructions for the model to break away from generic, “standard” AI templates and create a unique, brand-aligned identity.
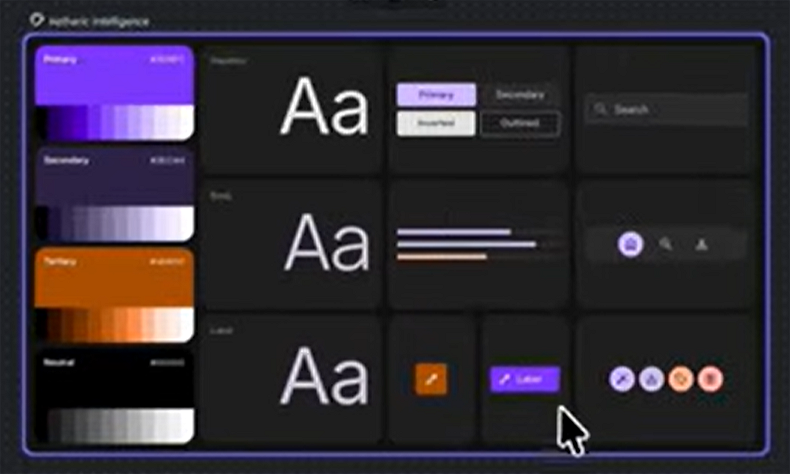
Stitch 2.0 generates a centralised design system for every project — the default is entitled Obsidian Ember by default — which acts as the visual bedrock for all generated components.
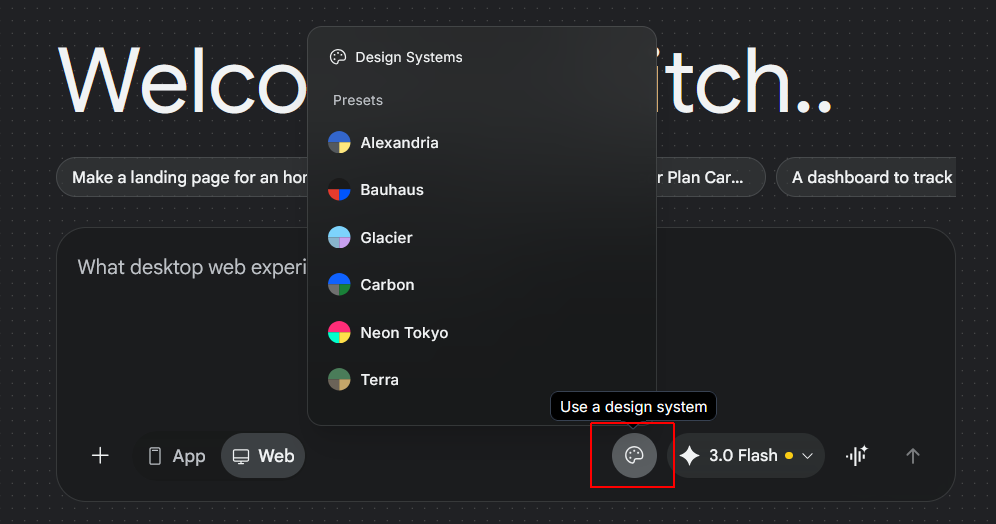
You can choose an alternative preset design system by clicking the Easel icon at the right of the chatbox.
Stitch project setup
Your first step in using Stitch is to configure your project settings:
- Project Type Selection: Choose between App (mobile-first, native-style interfaces) or Web App (responsive desktop and browser-focused layouts).
- Model Engine Selection: Stitch leverages Google’s frontier models to drive the design logic.
Model |
Performance Characteristics |
|---|---|
Gemini 3.1 Pro |
The frontier model. Provides superior design depth and handles complex layouts. Slightly higher latency. |
Gemini 3.0 Flash |
Optimised for speed and rapid prototyping. Ideal for quick iterations where extreme design nuance is secondary. |
Inspiration inputs
Stitch 2.0 uses Nano Banana as its backend image processing engine to interpret visual references. Users can provide context through:
- File Uploads: Uploading screenshots for the model to analyse and mimic.
- Direct URLs: Providing live website addresses for the model to crawl.
The infinite canvas layout
The core workspace is an infinite canvas: a spatial environment where multiple design iterations can be viewed and compared simultaneously, without the constraints of a traditional paginated interface.
- Agent log: Located in the bottom-left corner, the Agent Log provides a transparent view of the model’s “thinking” process and command history. It displays how the AI interprets prompts and translates them into design instructions.
- Edit mode: Selecting the Edit (pencil icon) button enables direct manipulation of individual UI components or global layout adjustments.
- Preview mode: This mode renders the design in a new browser tab, allowing for a full-scale interactive assessment of the prototype’s responsiveness and flow.
Variant generation and iteration tools
Stitch provides a robust suite for creative exploration, allowing users to rapidly pivot designs without restarting the project.
The iteration workflow operates as follows:
- Right-Click interaction: Right-clicking any layout or component opens a context menu with Regenerate (a total redo of the element) and Variants.
- Granular variants: Users can choose to vary specific dimensions — such as Layout, Colour Scheme, or Images — while keeping the rest of the design intact.
- Custom exploration: The “Explore” feature includes a Creative Range slider (reminiscent of Midjourney’s ‘stylize’ parameters). Users can request multiple options (e.g. three versions) and determine how far the model should deviate from the original reference.
Reference docking
When the model generates multiple variations, clicking a version adds it to a reference dock at the bottom of the canvas. This signals to the model that future refinements should prioritise the characteristics of those specific selected references.
Live mode: screen-aware interaction
Live mode transforms the design process into a real-time, voice-activated collaboration. When activated, the model “looks” at the user’s active screen, providing immediate context for voice commands.
Users can request complex, dynamic modifications through natural conversation. For example, a user can say: “Add some dynamic motion graphics and subtle cursor effects.”
Code export and developer handoff
Once a design reaches the “80–90% solution” stage — where the visual identity is locked and the layout is professional — it is ready for handoff to a development environment.
The handoff workflow is as follows:
- Select the desired page or component on the Infinite Canvas.
- Navigate to the More menu in the top navigation bar.
- Select Export.
- Choose the export target:
Export Target |
Best Used For |
|---|---|
Code to Clipboard |
Recommended for immediate use in coding agents such as Claude Code. |
Figma |
For further high-fidelity design manual adjustment. |
Jules / AI Studio |
For specialised model tuning and developer workflows. |
By pasting the high-fidelity code from Stitch 2.0 into an agent like Claude Code, the agent begins with a superior visual foundation. This prevents the agent from wasting tokens on iterative CSS styling and layout fixes, allowing it to focus entirely on functional logic, API integrations, and deployment.